Dialog Box View


The Dialog Box view shows a single dialog box resource in WYSIWYG mode so you can see exactly how the dialog box will appear during run-time.  Source and target dialogs can be displayed side by side or individually, captions and control items can be selected for translation/modification, and there's even a Layout Editor you can use to change the size of a dialog box and/or the size/position of its control items.


See also:  "Dialog Box Layout Editor."


NOTE:  The Dialog Box view is used to display and edit Windows Win32 dialog boxes as well as .NET Windows Forms.  A special editor for .NET Windows Forms is also available and can be accessed via the Open External .NET Forms Editor toolbar button (shown right).


Figure 1:  The Dialog Box view with two toolbars at the top and the split view displaying the source (right) and target (left) dialog boxes in WYSIWYG mode.  The lower part of the view has various tab views with other relevant information.  Note that the Layout Editing button has been pressed to activate the Dialog Box Layout Editor.


Opening the Dialog Box View

The Dialog Box view can be opened from the Project window (primary window of a translation project) in one of three ways:

Clicking on the View Resource toolbar button.

Double-clicking on the appropriate entry in the Text Table view.

Clicking on the Dialog Box symbol in the Text Table view.


Figure 2:  Dialog box resources in the Project window's Text Table view.


Translation Mode vs. Layout Editing Mode

As a safeguard against any unwanted/accidental changes during text translation, the Dialog Box view is equipped with two different modes.  The translation mode is the default mode in which only controls with text can be selected.  The layout editing mode lets you select the dialog box itself or one of the items contained therein for resizing/repositioning.


Use the Layout Editing toolbar button (shown left) or the Edit Dialog Box Layout command in the Layout menu to switch from one mode to another.


·

Translation Mode

When the Dialog Box view is in the (default) translation mode the text of a control item can be selected with the mouse or with the Shift + Tab keys.  The text of the selected control item or dialog box caption appears in the Translation Edit bar where it can be translated/edited.  Only text items can be selected in translation mode.


·

Layout Editing Mode

The layout editing mode lets you size dialog boxes and size/move individual controls.  Unlike the translation edit mode, the layout editing mode lets you select dialog box items as well as the dialog box itself to perform layout operations.


Toolbars

The Dialog Box view has two toolbars with commands for working with dialog boxes.  The Dialog Box View toolbar will be discussed here; the Layout Editing toolbar is described in the "Dialog Box Layout Editor" help topic.


·

Dialog Box View Toolbar


Close Button

Closes the Dialog Box view.


Fixed View Button

Fixes, or designates, the view as the one view for displaying dialog box resources.  When this button is pressed, this view alone will be used to display dialog box resources.  Otherwise, a new, separate view will be opened for each dialog box that you want to display.


Layout Editing Button

Activates the layout editing mode to resize/reposition dialog boxes or control items. (See the "Dialog Box Layout Editor" topic.)


Open External .NET Editor Button

Opens the External .NET Forms Editor.

NOTE:  This command is only available if the selected item is a .NET Windows Form.


Tile Window Button

Tiles the window vertically with the primary (WYSIWYG) Dialog Box view on top and the tab views on the bottom.


Toggle Grid Button

Toggles the visibility of the layout grid on and off.


Source View Button

Limits the WYSIWYG display to the source dialog box only.  The target dialog box will be hidden.


Source and Target View Button

Displays the source and target dialog boxes side by side.


Target View Button

Limits the WYSIWYG display to the target dialog box only.  The source dialog box will be hidden.


Previous Dialog Button

Displays the previous dialog box (sequentially) in the active translation project.


Next Dialog Button

Displays the next dialog box (sequentially) in the active translation project.


·

Layout Editing Toolbar


The Layout Editing toolbar features command buttons for modifying the layout of dialog boxes and individual controls.  These commands are discussed in the "Dialog Box Layout Editor" help topic.


Tab Views

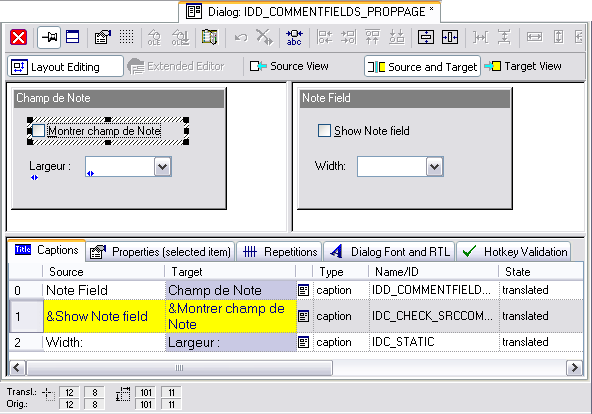
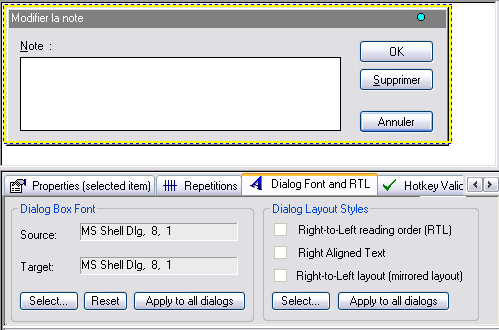
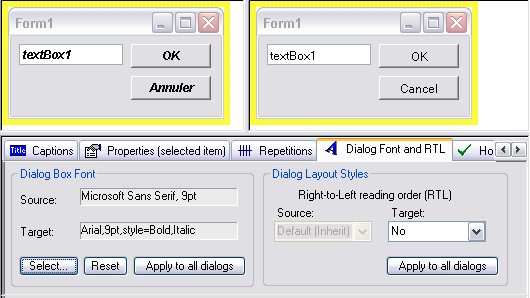
There are eight different tab views in the secondary window of the Dialog Box view: Captions, Repetitions, Hotkey Check, Overlapping, Text Fit, Size/Position, Font and RTL, and Properties (refer to Figure 1).


·

Captions Tab View

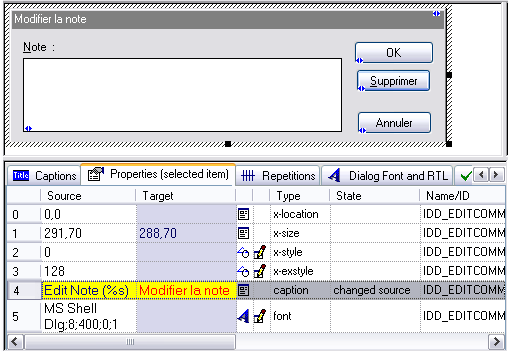
The Captions tab view (Figure 1) lists the caption texts of all the controls in the currently selected dialog box.  As with the Text Table view, an item can be selected and translated directly in the view (inline editing) as well as through the Translation Edit bar.


·

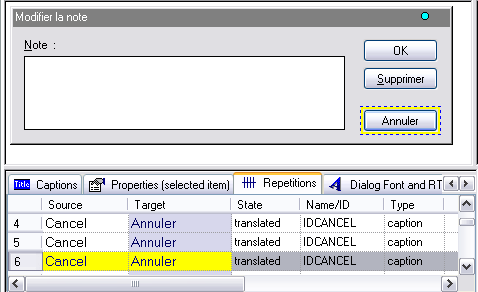
Repetitions Tab View

The Repetitions tab view (Figure 3) lists all of the repetitions for the item (caption text) currently selected in the Dialog Box view.  All translation units that have the exact same source text are considered repetitions.


Figure 3:  The Dialog Box view with the WYSIWYG display on top and the Repetitions tab active at the bottom.  The "Cancel" button (French translation: "Annuler") has been selected and the Repetitions tab shows a total of 6 items having this exact source text.


·

Hotkey Check Tab View

The Hotkey Check tab view lists those caption texts for which hotkey errors have been detected (missing/doubled hotkeys).  This check is performed automatically; manual execution is not necessary.  The tab will display one of two symbols (Figure 5) indicating the presence or absence of hotkey errors for the selected dialog box.


Two types of hotkey errors are reported:

1.

Missing hotkey.  The source text contains a hotkey specification (mnemonic key), but the target text (translation) does not.

2.

Doubled hotkey.  The same hotkey character is used more than once.


Hotkey errors can be resolved in one of two ways:

1.

Edit the target text (translation) in the Translation Edit bar or use direct inline editing to place the ampersand character (& – designates the next character as the hotkey) in front of the desired hotkey character.

2.

Use the Hotkey Suggestion dialog box to resolve the error.  Access by right mouse-clicking to open a local menu and selecting the Hotkey Suggestion command (Figure 4).  The same command is also available in the Edit menu.

3.

Use the hotkey suggestion page in the Extended View bar.  The Hotkey Suggestion command from the Checks menu activates the page.


Figure 4: The Dialog Box view with the WYSIWYG display on top and the Hotkey Check tab active at the bottom.  Two missing hotkeys have been reported.


Figure 5:  The Hotkey Check tab view.

A green check mark on the Hotkey Check tab indicates that there are no hotkey conflicts for the selected dialog box.

A red exclamation point symbol on the Hotkey Check tab indicates that hotkey conflicts have been found for the selected dialog box.


Related topics...


·

Other "Check" Tabs: Overlapping and Text Fit Tab Views

These tabs show errors that have been found by the overlapping and/or text fit checks, respectively, plus related options.  They are described in further detail in separate topics:

-> "Overlapping Tab View"

-> "Text Fit Tab View"


Other check functions for dialog boxes are also available, such as the missing/doubled hotkey check and the trailing colon/ellipsis check.


Please refer to the "Checks" help topic for information on running checks and viewing reported errors.


·

Size/Position Tab View

The Size/Position tab displays information about layout changes that have been made to a source or target dialog box or dialog box item.  See the "Size/Position Tab View" help topic for further details.


·

Font and RTL Tab View

The first function of the Font and RTL tab is to set the font of the currently selected target dialog box and/or of all the dialog boxes in the translation project at once (Apply to all dialogs command button).


The second function of this tab is to set the RTL (right-to-left) reading order for the currently selected dialog box.  As with the font, RTL flags can be set for the selected dialog box or for all dialog boxes at once with the Apply to all dialogs button.


NOTE ON WIN32 DIALOG BOXES AND .NET WINDOWS FORMS:  The "dialog layout styles" vary accordingly for Win32 dialog boxes (Figure 6) and .NET Windows Forms (Figure 7).  The Apply to all dialogs command button only works for Win32 dialog boxes OR .NET Windows Forms, respectively. This is noteworthy if the translation project contains both Win32 and .NET resource files.


Figure 6:  The Dialog Box view showing a Win32 dialog box, with the WYSIWYG display on top and the Font and RTL tab active at the bottom.


Figure 7:  The Dialog Box view showing a .NET Windows Form, with the WYSIWYG display on top and the Font and RTL tab active at the bottom.


·

Properties Tab View

The Properties tab (Figure 8) displays all the editable (translatable) properties of the currently selected dialog box control or of the dialog box itself.


NOTE:  If you wish to edit a property, the use of an available resource type editor is recommended.  Click on the Resource Type Editor symbol (shown left) to open a local menu

where you can select and open a specific resource type editor.  Alternatively, a property can be edited directly through the Translation Edit bar.


Figure 8:  The Dialog Box view showing a .NET Windows Form, with the WYSIWYG display on top and the Font and RTL tab active at the bottom.


^ TOP ^