Import from TMX File


The Import from TMX File command is used to import data from a TMX file (file extension: .tmx) into an RC-WinTrans translation project.  Access this command via the Import toolbar button (shown right) or from the File menu.


The Import from TMX File command first opens a dialog box where you must select the TMX file to be used for the import.  After a file has been selected, the Import from TMX File dialog box will be opened where the import settings are specified.


NOTE:  To import data for select text items only, select the items in the Text Table view first, then start the import process.


The import and export functions are implemented in and performed by the RC-WinTrans add-on product "TMX Import/Export".  The add-on is included and installed with RC-WinTrans 9.3 or later versions.


See the product documentation for RC-WinTrans' TMX Import/Export Add-On for more info.


See also:  "Import/Export (Overview)."


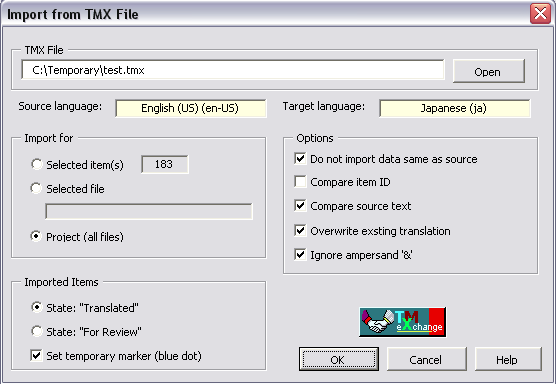
Figure:  The Import from TMX File dialog box.


Import from TMX File Dialog Box

The Import from TMX File dialog box (accessed via the Import from TMX File menu/toolbar command) contains the following elements:


·

TMX File Groupbox (File name Field)

The name of the file from which to import the selected data.  This can be the name of an existing TMX file or of a new one, but a file name must be specified (in the "Open File" dialog displayed just before the Import from TMX File dialog).  Use the Open button located to the right of the field to open the selected TMX file.


·

Source language Display

The source language of the active translation project.


·

Target language Display

The active target language in the current translation project.


·

Import for Groupbox

Select the items for which data is to be imported using the radio buttons next to the following options:

Selected item(s)

Checking this option will import data for the item(s) currently selected in the Text Table view. The total number of items currently selected is shown in the display to the right of this option.

Selected file

Data will be imported for all the items in the currently selected file if this option is checked.

Project (all files)

This option lets you import data according to status, specifically: translated, non-translated, and/or changed items.  Data will only be imported for items with the specified status.


·

Options Groupbox

Additional options available to modify the import operation:

Do not import data identical to source

Select this option to only import (target) data when it is different from the source data; if source and target texts are identical, no data will be imported.


Compare item ID

The item ID will be taken into account during the import operation when this option is checked; if the item IDs of the source and target data do not match, no data will be imported.

Compare source texts

Selecting this option causes the source texts to be compared during the import process; if the source texts do not match, no data will be imported.

Overwrite existing translation

Select this option to remove any existing translations and replace them with the ones found by the import process.  If this option is not selected, (selected) items with translations will be skipped.

Ignore ampersand (&)

The ampersand character ("&" - hotkey specification) will be ignored by the import function.


·

Imported Items Groupbox

Designate items for which translations have been imported by assigning one of two states ("translated" or "for review") and/or a temporary (blue dot) marker.


Related topics...


^ TOP ^