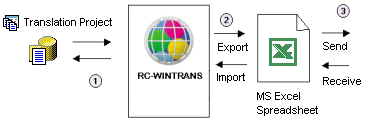
This topic describes external translation using Microsoft Excel. The process consists of exporting texts from a translation project into a Microsoft Excel file (.xls or .xlsx) and, once translation is complete, of importing translations back into the (main) project using the Excel file returned by the translator.
|
Figure: Text to be translated is exported to a Microsoft Excel spreadsheet. The translation data is imported from the Excel spreadsheet returned by the translator. See also: "External Translation." |
Start by selecting which items to send to the translator- this can be all the text data contained in the source file(s), or only the items needing to be translated, or just items needing review because the source text has changed. In the steps outlined below the exported Excel file is filled with text items needing translation and translated items needing review because of changes in the source text.
|
|
Export Procedure (Exporting an Excel File for External Translation) |
|
1. |
Open the translation project. |
|
2. |
Prepare the project for translation by filtering or supplementing the translatable data. For example, setting items with text that is generally not translatable as "excluded from translation" ensures that a translator will only be able to see and edit translatable items. Another option is to add a "note" to an item (e.g., where/how a text is used in the software) to provide the translator with more information and improve translation accuracy. |
|
3. |
Use the "Export to Excel" command. See also: "Export to MS Excel" help topic. |
|
4. |
Set the (.xls or .xlsx) file name and data export options. Try to minimize the number of items by exporting only those items that need to be edited. This will reduce the time required to complete the translation task along with the total cost. Ways to reduce the number of items to be translated:
NOTE: For a better overview of the listed items use the export option "Sort (A to Z)." |
|
5. |
Set the format options. The import process requires translations to be assigned to the correct source items in the project by selecting/enabling the following checkboxes under "Additional Options" on the "Format" page of RC-WinTrans' Export Assistant:
|
|
6. |
Send the exported Excel file to the translator. |
|
7. |
Translation of the exported Excel file. The translator uses the Microsoft Excel application to translate the items. When translation is complete, the translator returns the translated Excel file to the project manager/distributor. |
|
|
Import Procedure (Importing Data from a Translated Excel File) |
|
8. |
Open the (main) translation project. |
|
9. |
Activate/Display the target language for which translations should be imported. |
|
10. |
Use the "Import from Excel" command. See also: "Import from MS Excel" help topic. |
|
11. |
Use the settings in the Import Assistant to define the import operation according to your preferences (as in step 5 above). Make sure the following "Match" options are selected:
|
|
12. |
Run the import operation. NOTE: A translation is also imported for an item where the source text in the project has changed. This behavior will be improved. |
|
13. |
Use the "Auto-Translate" function to complete the translation if the "Without repetitions" export option was used in step 4 above. Select the "Dictionary/TM" | "Auto-Translate" menu command to translate repetitions (identical source texts) which were not included in the Excel file exported for translation. |
|
14. |
Project review/check functions: check the translations using the check functions available in RC-WinTrans. In particular, check the size/location of dialog box items ("text fit check"), doubled and missing hotkeys in menus ("hotkey check"), and verify that items with the same source text are translated uniformly ("uniform translation check"). Placeholders used in software texts need to be identical in both the source and target texts so it is important that these be checked too ("placeholder check"). |
>> Finished/Ready.
