|
Adding a Task Marker, Bookmark
or Re-Check Marker |
A
, , or
can be attached to a translation unit using any of the following
methods:
· |
click
on the appropriate command button in the Item State toolbar; |
· |
select
the desired command from the Edit
menu; or |
· |
use
the command buttons found in the Translation Edit bar
(task and re-check markers only). |
Initially
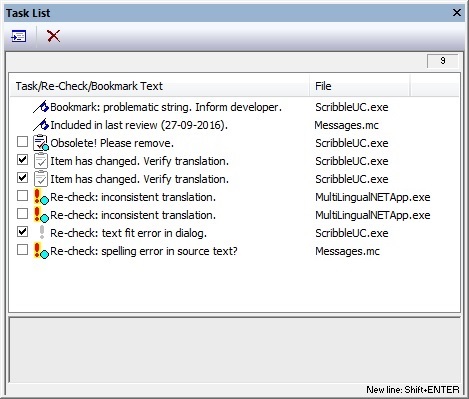
Tasks view items are
unchecked, indicating that the task needs to be performed. These
are also capable of being checked to indicate that the task has
been completed. Doing this causes the task's icon to change
color (indicating completion/resolution).

|
Description Texts |
Each
task marker, bookmark, and re-check marker has a default description
text displayed in the view. The description text can be
edited in the field at the bottom of the Tasks
view (see figure above). A single-click on a selected entry in
the list display will also allow this text to be modified.
Additionally,
the description texts of task markers and re-check markers can
be edited in the respective fields located in the Translation
Edit bar.

|
Processing Items Listed in the
Tasks View |
Double-click
on a list entry to select the corresponding translation unit in
the Text Table view. The
Go to Translation Unit
button at the top of the view will also activate the selected
task's item in the Text Table
view/Translation Edit bar.
NOTE: If
the translation unit is not currently visible (not listed) in
the Text Table view,
a Flash
Info window appears to inform the user.
A
task can be designated as "completed" (without deleting
it) by checking the check box beside the entry in the Tasks
list. Doing this causes the task item's icon to change color
(indicating completion/resolution).

|
Deleting a Task |
To
delete a task, select the entry and press the Delete button
at the top of the view. Selecting the item and using the
appropriate button from the Item State toolbar will also remove an existing
task marker,
bookmark, or re-check marker.

|
View All Items with Re-Check
Markers |
The
Show Re-Check Items
Only button (shown here, right) in the Item State toolbar
can be used to fill the Text
Table
view with only those items which have had a re-check
marker assigned to them. This is useful for quickly
identifying and locating translation
units requiring review. |

|
^ TOP ^ |


