Import from Translation Project


Overview

The Import from Project command is used to import data from an existing translation project, as when a project has been translated/edited by a translator and returned to the project manager.  The import from project function was designed with this task in mind, so the import should be performed between two copies of the same project, where one copy is the current project (the target project, the project for which data is being imported) and the other is the project that was edited (the source project, the project from which data is being imported).


If the translator has sent back a packed translation project, unpack it first using the File  |  Open  | Open Packed Translation Project (ZIP file) menu commands.


The project from which data is to be imported (the source project) can be located in one of two places:

1.

On disk (but not listed in the Projects Overview tab view).  In this case you will need to select the project file (file extension: .rwtproject) to specify the project.

2.

In the Projects Overview tab view.  In this case you will need to specify the name of the project located in this view.


There are three different types of imports:

1.

Import and replace the existing data files completely.

2.

Import data for specific translation units (imported according to ID).

3.

Import data for string-type  translation units only (ignoring IDs).


1.

Import and replace the existing data files completely.

The import is realized by replacing the translation data files completely.  The target project's database will be completely overwritten by the source project's database.

2.

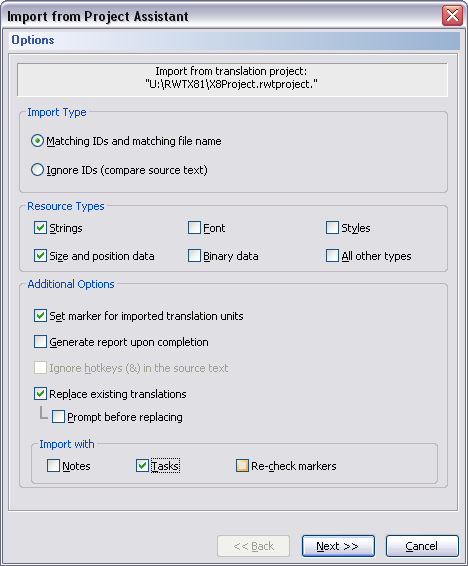
Import data for specific translation units (imported according to ID).

The import is performed by identifying the corresponding translation units in both projects.  This is done by identifying the source and target texts according to the ID/name of the unit.  The target data for a translation unit can only be imported if the target data of the current project is different from the target data contained in the project from which you are importing.  The Replace existing translations option lets you able/disable this feature.

Imported data types:  Generally, data will be imported for translation units that are not excluded from translation or locked.  Resource types relevant to the import can be selected by checking the corresponding checkboxes in the Resource Types section.

Importable data:  Additional data that can be imported include tasks, notes, and re-check markers.  Existing tasks, notes, and/or re-check markers will be replaced.  Relevant types of data for the import can be selected by checking the corresponding checkboxes in the Import with section.

Data that is not imported:  User extensions cannot be imported.

3.

Import data for string-type translation units only (ignoring IDs).

The import is performed by identifying the corresponding translation units in both projects.  This is done by identifying the source and target texts according to their source texts.  Hotkeys can be ignored if the appropriate option is selected.  The target data for a translation unit can only be imported if the target data of the current project is different from the target data contained in the project from which you are importing.  The Replace existing translations option lets you able/disable this feature.

Imported data types:  Generally, data will be imported for translation units that are not excluded from translation or locked.  Resource types relevant to the import are string types (e.g. "caption," "string," "text,"...).

Data that is not imported:  Tasks, notes, re-check markers, alternate translations, and user extensions cannot be imported.


Import from Project Assistant

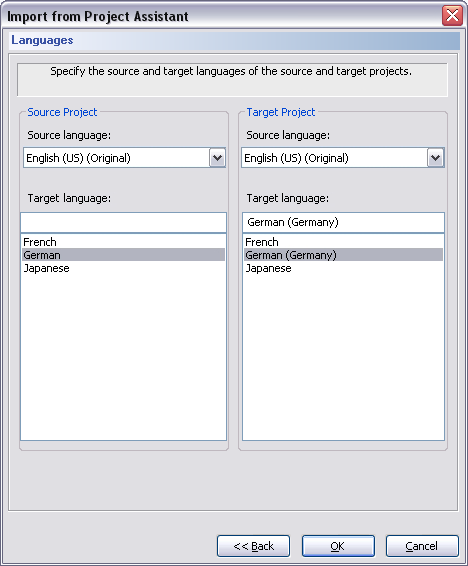
The Import | from Project command in the File and Project menus and in the Project toolbar ( ) prompts you to select a file for the import and opens the Import from Project Assistant after the file (file extension: .rwtproject) has been specified.  The Import from Project Assistant consists of two pages: the Options page (Figure 1)and the Languages page (Figure 2).


Figure 1:  The Import from Project Assistant's Options page.


·

Options Page

The Options page contains options for the import operation.  It consists of the following elements:

Import Type Groupbox

Select the preferred type of import from these options (described at the beginning of this topic):

Matching IDs and matching file name Radio Button

Import data by matching ID and file name.

Ignore IDs (compare source text) Radio Button

Import data by matching the source texts (ignoring IDs).

Resource Types Groupbox

Select the resource types for which data is to be imported.  Select from string types, font, styles, size and position data, binary data, and/or all other resource types.  This option is only available if the Matching IDs and matching file name option is selected.

Additional Options Groupbox

Provides a set of additional options to modify the import from project operation:

Set marker for imported translation units Checkbox

Check this option if you want each item for which data has been imported to be marked in the Text Table view (with a blue dot (temporary) marker).  This option is not available if the Replace translation data files option is selected.

Generate report upon completion Checkbox

When this option is selected, RC-WinTrans will create an import report after the operation is complete.

Ignore hotkeys (&) in the source text Checkbox

Check this option to ignore hotkeys in source texts when the import operation is performed (e.g., the source text "File" will match the source texts "&File" and "F&ile" if this option is selected).  This option is only available if the Ignoring IDs option is selected.

Replace existing translations Checkbox

If this option is selected, the target data for a translation unit is only imported if the target data of the current project is different from the target data contained in the project from which you are importing, otherwise the existing target data will not be replaced.

Prompt before replacing Checkbox

Check this option if you want RC-WinTrans to inform you before an existing translation is replaced.

Import with Groupbox

Select additional data (notes, tasks, and/or re-check markers) to be included in the import. This option is only available if the Matching IDs and matching file name option is selected.


Figure 2:  The Import from Project Assistant's Languages page.


·

Languages Page

The Languages page is used to select the source and target languages of the source and target projects being used for the import.  It contains the following elements:

Source Project Groupbox

Select the source and target language of the source project (the project from which data is being imported).

Source language Drop-Down List

Select the source language of the source project from this list.  The source project's active source language is pre-selected.  The import will only be performed for the selected languages.  Language selection is only available if the Ignore IDs option (Options page) is selected.

Target languages List

Select the target language of the source project from this list.  The source project's active target language is pre-selected.  The import will only be performed for the selected languages.  Language selection is not available if the Replace translation data files option (Options page) is selected.

Target Project Groupbox

Select the source and target language of the target project (the project for which data is being imported).

Source language Drop-Down List

Select the source language of the source project from this list.  The source project's active source language is pre-selected.  The import will only be performed for the selected languages.  Language selection is only available if the Ignore IDs option (Options page) is selected.

Target languages List

Select the target language of the source project from this list.  The target project's active target language is pre-selected.  The import will only be performed for the selected languages.


Multiple Translations

When the Ignore IDs option (Options page) is selected, RC-WinTrans may find more than one possible translation.  In this case the Select Translation dialog (Figure 3) appears showing a list of possible translations.


Figure 3:  The Select Translation dialog box (Import from Project Assistant).


Select Translation Dialog Box

The primary elements of the Select Translation dialog box are:

·

Translations List

The Languages page is used to select the source and target languages of the source and target projects being used for the import.  It contains the following elements:

·

Don't show this dialog again Checkbox

Check this option to prevent the Select Translation dialog from appearing during future import operations.  RC-WinTrans will then take the first possible translation whenever multiple translations are found.

·

Set re-check marker Checkbox

A re-check marker with the text of the Re-check marker field (see next item below) will be assigned to the current translation unit when this option is selected.

·

Re-check marker Field

This field contains a descriptive text for the re-check marker if the Set re-check marker checkbox is checked.  The field is initially filled with a standard text that can be modified by the user.

·

Stop import Button

Stops the import process.

·

Skip Button

Skips over the current translation unit.

·

Re-use selection Button

Accepts the translation selected in the Translations list for the current translation unit and applies it to all other translation units with the same source text.

·

Accept Button

Accepts the translation selected in the Translations list for the current translation unit.


^ TOP ^