![]()
Figure 1: Menu commands for exporting a translation project (to send to a translator).
|
The export of a translation project was implemented as a means of supplying a(n) (external) translator with an RC-WinTrans project that is an exact or partial duplicate of the current project. Exporting means creating that new translation project on the basis of an existing (and currently open) one. "Partial duplicate" means that the contents of the exported translation project may consist of some part(s) of the main project, e.g,. just one target language (the one to be edited by the translator), or only certain files or data.
RC-WinTrans' Export Assistant guides the user through the steps required to create a translation project to export. These steps are described below in this topic.
See also: "External Translation."
Open the Export Translation Project Assistant using the following menu commands: File | Export | Export Project for Translator (see Figure 1)
NOTE ON RECEIVING TRANSLATED PROJECT: The data of a translation project can be selectively imported using the Import | Import from Translation Project commands from the File menu. |
|
|
Figure 1: Menu commands for exporting a translation project (to send to a translator). |
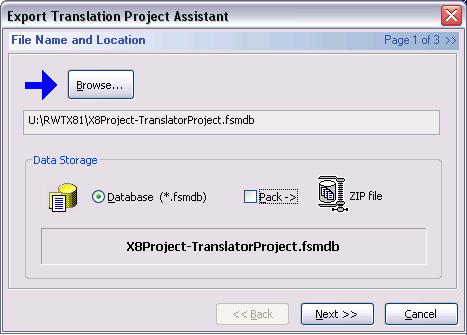
The initial page of the Export Translation Project Assistant asks you to designate a file name and to select a location for it. The translation project will be exported as .fsmdb database file. Optionally the project database file can be packed to a ZIP file to reduce the file size for distribution.
Confirm your selections and continue on to the next step by pressing the Next button. |
|
Figure 2: The initial page of the Export Translation Project Assistant where a file name and location for the project to export is specified as well as the data storage method. |
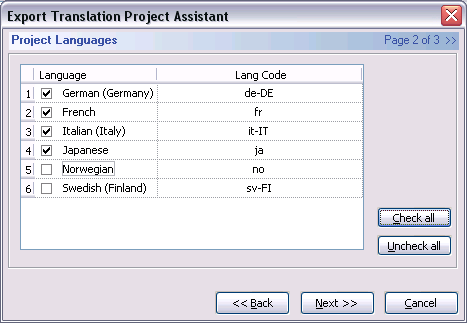
The Project Languages page provides you with a list of the target languages already included in the current translation project- select one or more of these to be included in the exported translation project. Confirm your selection and continue on to the next step by pressing the Next button. |
|
Figure 3: Specification of the target language(s) to include in the exported translation project. |
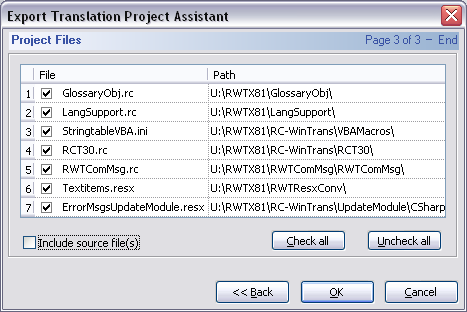
The Project Files page asks you to select the project files that you want to include in the exported project. The files list shows all the files contained in the current translation project. If the checkbox next to the file is checked, the translation data of that file will be included in the exported translation project.
Note: The source file will not be included in the project database.
Press the OK button to finish and export the translation project. The project or respective ZIP file will be saved in the location specified on the first page of the Assistant.
RC-WinTrans will inform you of the translation project's creation by displaying a Flash Info window and a message in the Output view. |
|
Figure 4: Specification of the project files to be included in the exported translation project. |
|
|